(Sorry about the wonky formatting, I'm trying to fix it!)
This is a cost-effective way to mimic the look of screenprinting! It can be a little tedious and time-consuming, depending on the project, but it is worth it to achieve clean lines and a uniform look.
YOU WILL NEED:
- freezer paper: You can find this at any grocery store, usually with the plastic wrap and aluminum foil. wax paper is NOT the same thing and will not work!
- an iron: This adheres the freezer paper to your fabric. the paper stays put until you pull it off, and doesn't leave any residue behind.
- fabric paint: I prefer to purchase regular acrylic paint and mix it with fabric painting medium (it can be found in the same aisle as the acrylic paints and is opaque milky-white in color). This means you have an infinite number of color choices and can even mix a custom color. The paint/medium mixture also dries completely flat, unlike most fabric paints. You are welcome to use regular fabric paint if you like - this is simply my preference.
- something to pour or mix your paint in: Preferably something shallow and flat, so it will fit inside...
- a Ziploc bag: Very useful if you need to store your paint in between applications. Just stick your paint and brush in a bag, close it tight and keep it in your fridge until you need it next.
- sponge brushes: For applying the paint, of course.
- xacto knife: For cutting out the stencil with precision.
- card stock: For the final stencil pattern. Thin cardboard, like from a cereal box, works also.
- your fabric, scissors, ruler and a pencil: Duh.
As you can already see this is a very cheap list of materials and you likely already have some of these at home!
STEPS:
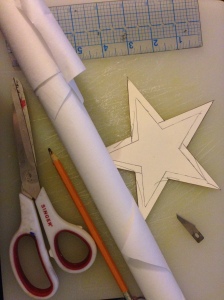
1. Design your stencil. I'm going to assume you spent enough time doodling in pre-school and kindergarten to know how stencils work. For my project I just needed a simple star shape which I cut from card stock to use as the "master." I definitely recommend using card stock for this as it is a lot easier to trace around.

2. Trace onto freezer paper. Do this on the non-shiny, non-waxy side. That's the side that will be ironed down and is not easy to draw on anyway. I recommend using a pencil, nothing with ink as that presents a risk of staining your fabric. Just go carefully so the pencil doesn't tear the paper.
3. Cut around the shape with scissors. Try to give yourself a decent allowance around the shape, that way if you get overzealous with the paintbrush it goes on the wax paper and not your fabric.
4. Cut out the shape using the xacto knife. If your design has cut outs, be mindful of those and don't throw them away. Use a ruler to keep straight edges neat.
5. Iron the stencil onto your fabric. Use a medium-high heat, bearing in mind what kind of fabric you're using. I've never had the freezer paper melt on me so don't worry about hitting it with high heat (as long as you aren't using a synthetic fabric). Protip: make sure your fabric is dry - steam makes the freezer paper come loose.
Repeat 2-5 until you have all the stencils you need.
6. Paint! You can start painting as soon as all your bits are ironed down. A stamping/up and down motion is sometimes more useful for getting into corners and edges than a regular brushstroke. Be sure to let the paint fully dry between each layer (this is why storing your paint/brush in a Ziploc bag in the freezer is a handy trick to know!) If your stencils come loose in between layers, simply iron them back down - fabric paint is meant to withstand an iron's heat, so no worries there.
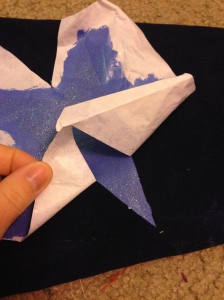
Keep in mind that for darker fabrics, you will have to add several layers of paint. In the above photo, you can see the difference between one dry layer of paint and a layer of fresh paint - you might be fooled by how dark the fresh paint looks! For this project I needed about four layers of paint per star, so keep that in mind. I also added some glitter paint on top.
7. Once you're happy with the color, peel the stencils away. Absolutely WAIT until everything is dry until you do this, lest something get smeared accidentally. If you're done painting, "set" the painted areas using an iron (your fabric paint will have more specific instructions on this) and wash the finished garment if you like.
This would have turned out cleaner had I been more careful with my stencils :P Try not to rush!
Dipper is SammySimplicity, Photo by David Ngo


