Phoenix Comicon: A Whirlwind Occasion
Article by Sam of FanGirl Nation Magazine
| All | Blog | Tutorials | Con Reports | Product Reviews |
Phoenix Comicon: A Whirlwind Occasion
Article by Sam of FanGirl Nation Magazine
Hello everyone!
In September I decided it was high time I build a costume for a character I have adored since childhood: Fuu Hououji from Magic Knight Rayearth. Fuu's costume contains the following parts:
Since this took a lot of work and I have had ALOT of questions about how it was built I figured it was high time I share with you how I created this costume. Here is what you will need for this costume....
Interested in the rest of the build process? Check out my Instructable HERE.
Hello everyone!
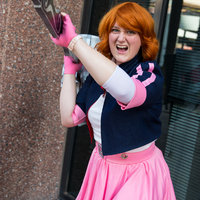
I recently re-designed my Surge cosplay from X-Men (Earth-616 series) and wanted to share some of my techniques. This character is not commonly represented in the comic or cosplay community and yet she played an integral part in helping the mutants of the X-Men series. So, taking a little bit of her old designs and a little bit of her new I came up with a plan to make the following:
• Black & Yellow Body Suit (Spandex obtained from Amazon)
• A pair of Power Gauntlets (made from EVA foam and Metallic Spandex)
• Yellow Leg Armor (Made from EVA Foam and Spandex)
• A yellow X-Men Belt (Made from EVA foam & Spandex)
Interested in the rest of the build process? Check out my Instructable HERE.
Here is a link to my Jedia Nagai Makeup tutorial:
https://www.youtube.com/watch?v=uHwzSjQl6dU&feature=youtu.be&list=PLv9tdfniSPsemVpljFULR4GP5PJ5oiEnx
Saboten Con was incredible this year! I had the chance to host 5 panels, attend a few others, explore their vendor hall and even compete in their masquerade! Last year was my first time in any masquerade and this year marked my fourth masquerade appearance. The experience was amazing and it has taught me so much about competing as a cosplayer. The staff at Saboten was friendly, helpful but a little under employed. They could certainly have used a few more volunteers. The photographers were wonderful and I REALLY had fun hosting panels: THANK YOU ATTENDEES!
I am looking forward to next year...although I would prefer the venue return to West Gate (parking in Down Town Phoenix is a pain). The Glendale location for Saboten last year is far more suitable than the Sheraton in down town. It offered more seating, more concise directions and it also provided a greater amount of shade for photos. Venue aside, I am pleased with what the coordinators put on this year and wish them the best in future endeavors.
Here are a few photos from the event...
Hello everyone!
Every Wednesday we’ll post about a happy little accident in cosplay. Today's story is about cutting Sintra...
"While attempting to make my armor for GoGo Tomago I ran into some trouble with the foam and paint fusing to a tarp so I had a last minute dash with Sintra. Sintra looks like it will be easy to cut...IT'S NOT. What I discovered while accidentally scoring an area I didn't mean to cut, is that the score weakened the Sintra and allowed me to bend the cut enough to slice all the way through. Getting creative, I score the Sintra, hit it with a heat gun on the scored lines then fully cut with a sturdy utility knife and BAM! I had a clean, even cut that did not require sanding! "
Hello everyone!
Every Wednesday we’ll post about a happy little accident in cosplay. Today’s story is brought to you by our founder Sam:
“It’s been just over a year since I began my cosplay journey. In that year I have learned A LOT! One such lesson surrounds Plasti Dip’s effectiveness on rigid foams (such as insulation foam). While crafting a piece I discovered that if the Plasti-Dip pools on rigid foam it LITERALLY EATS AWAY the foam leaving pockets/holes of damage. This happy little accident resulted in a quick way for me to mimic battle damage on props and armor.”
Hello everyone!
Over the past two months I have been building a set of Volstagg armor for my very first client. It was an ambitious endeavor and their were pitfalls along the way but it taught me a lot about foam smithing and what materials work best for certain designs. Let's get started!
I began this endeavor with reference art. Volstagg actually doesn't have a lot of imagery to go off of. There are some fan art piece, some movie art pieces and a few shots from the first Thor movie to go off of but other than that...it was slim pickings for reference material. I had a lot of guess work to do but I did not mind as I was given creative licenses for this build by my client. Here are the designs I settled on as my reference...
With reference in hand I gathered my client and wrapped him up in duct tape! Since I did not have the budget to create a full cast of him the duct tape dummy method worked out well (granted, the dummy lost an arm because I apparently lack the ability to tape two arms back up normally after cutting someone out of the duct tape mold). For advice on how to create a good duct tape dummy check out this tutorial video by The Woodland Elf:https://www.youtube.com/watch?v=5i7YhYMwpbc. NOTE: I would suggest cutting off/tearing off strips of tape and applying them to your model. The wrapping method actually reduces the size of the mannequin and creates fitting problems for armor builds.
Once the dummy/mannequin was created I began patterning. I used pattern ease ( a pattern fabric) and wrapped it around the mannequin...
After securing the wrap with some masking tape I used my reference art, my own schematic drawings and some sharpies to draft out the patterns....
When I was comfortable with the draft I cut out the patterns and laid them out for review...
For the armor I used a mix of materials:
3/4, 1/4 and 1/8 inch Closed Cell Foam (L200)
Insulation Foam (for more rigid items)
Faux Leather
Vinyl
I started with the chest piece as that seemed a goof place to begin and I felt most comfortable with the pattern for that item. Once all of the little pieces were cut (I used a VERY sharp utility knife - be prepared to go through LOTS of them OR have a sharpener as foam dulls knives quickly) I placed them together to test the fit then began gluing them with contact cement. NOTE: Contact Cement is TOXIC - wear gloves, a respirator and be sure to ventilate the room your are in. I used Weld Wood Contact Cement for this project (you can buy small and large containers of this at about any hardware store).
The next step in this process was applying detail to the 3/4 foam chest plate. I used 1/4 inch foam cut into strips (a trick to get straight cuts: lay masking tape down on the foam first and use it as a guide for cutting - it's MUCH easier than trying to hold a yard stick down or following a sharpie/pen line) then applied them in layers using contact cement.
Now that I had the chest plate complete I filled the cracks with Mod Podge and moved on to Volstagg's belt. The belt was VERY quick. I used an exacto blade to cut detail lines into the foam where Volstagg had intricate line work and use a Heat Gun on its low setting to separate the lines and create more depth. (NOTE: DO NOT GET TOO CLOSE TO THE FOAM - keep at least 6-10 inches away when expanding your details lines or your foam will bubble). Here are some progress shots for the belt...
Next were the pauldron's and bracers. I have made these using Worbla before so I had pre-existing patterns that I was able to modify and move forward with. If you struggle with armor patterns check out Kamui Cosplay: She has armor pattern books for beginners that include male and female patterns.
With the base pieces done I quickly put together a Tunic for Volstagg then hired a friend to make a knitted hauberk as knitting and I DO NOT get along.
Now it was on to the Axe...that took ALOT of work. I started out with L200 but discovered it was not rigid enough and the design just did not satisfy my creative side. So I moved on to Insulation foam (1") and I was NOT disappointed. It was perfect...except that it took me FOUR tries before I figured out how to cut, shave and sculpt the foam without knicking it too much. Once I had the axe cut out I attached it to a piece of PVC pipe then sealed it together with Hot Glue and L200 foam. I then wrapped the Pipe in EVA foam, painted the axe and wrapped the handle again in leather. Here are a few photos of the axe in its multiple iterations...
And Here was the final Result 
I am looking forward to taking more professional photos. For more images related to this build visit my gallery HERE.


